This section describes what each of the items in the InterOscitorTM menu system does in detail. Note that an underlined letter in the menu item name means that item can be accessed from the keyboard by pressing Alt and then the underlined letter. This is sometimes easier than using the mouse. Three dots at the end of the item name means that the item calls up a dialog box.
The following controls are in the upper right corner of the InterOscitorTM window:
![]()
They can be used for minimize, full screen, and exit. Minimize turns the window into an icon on the task bar. Full screen makes the window fill the whole screen. Exit exits the program.
Pressing the Space Bar causes the screen resolution to change to 640x480 and the title bar and borders to turn off, filling the screen with the video image. Press the Space Bar again to revert back to the normal window mode.
Here's a picture of the menu options that are available:
![]()
Here's a detailed explanation of what each menu item can do:
File Menu
Exit
Select this item to exit the program.
Options Menu
The Video Format menu item brings up a dialog that you can use to set the resolution and color range of the video digitized by your camera. Since it is part of the driver for your camera it is different for every camera. The picture below shows an example of what it may look like, though it may differ somewhat for your camera.
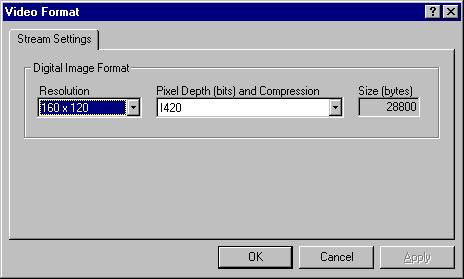
Use this dialog to make the video image larger or smaller and to control the number of colors displayed in the image. Making the image smaller will allow your InterOscitorTM to update the sounds faster which can result in smoother glides and more control. Making the image larger will slow updates down but will also give you finer control over the pitch and volume.
Video Source...
The Video Source menu item brings up a dialog that you can use to set the source of the video digitized by your camera as well as the color and brightness and perhaps other parameters. Since it is part of the driver for your camera it is different for every camera. The picture below shows an example of what it may look like, though it may differ somewhat for your camera and may not even exist.

Changing the color usually will have no effect on how your InterOscitorTM works. Changing the brightness or contrast may affect where the edges of your hand or body are drawn. This can be useful in difficult lighting situations when you want to exclude a background that interferes with tracking. By adjusting the contrast and brightness you may be able to get the detected edge to center on you rather than on some object in the background.
Video Display...
The Video Display menu item brings up a dialog that you can use to set the color and brightness of the video digitized by your camera. Since it is part of the driver for your camera it is different for every camera. The picture below shows an example of what it may look like, though it may differ somewhat for your camera and may not even exist.
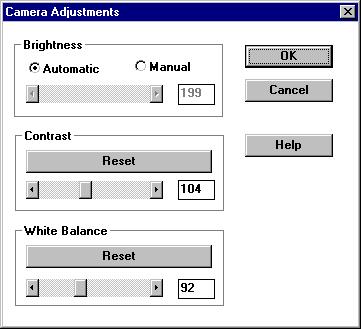
See the comments under Video Source for info on how these controls interact with your InterOscitorTM.
User Options...
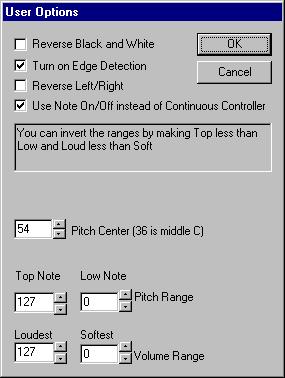
The Options/User Options menu item brings up a dialog that lets you customize your InterOscitortm in several ways:Reverse Black and White - When this box is checked it reverses the colors black and white on the screen. This is sometimes useful if you are projecting the video live, or to enhance the visibility of the image so you can better see it from a distance.
Turn on Edge Detection - When this box is checked edge detection is turned on and the images on the computer screen will appear as outlines of whatever the camera is pointed at. If you uncheck this box then the images on the computer screen will appear as solid filled in areas of whatever the camera is pointed at. The InterOscitortm will run faster with edge detection off on slower computers.
Reverse Left/Right - Checking this box will reverse the image on the screen left/right. This is useful if you are left handed or simply would rather have the controls reversed.
Use Note On/Off instead of Continuous Controller - This box is automatically checked or unchecked when you select a sound from the General MIDI menu, according to what is appropriate for that sound. Some sounds can't be heard at all in the continuous controller mode. All sounds can be heard in the note on/off mode, although they will sound like a piano key being repeatedly pressed rather than a smooth continuous sound like a violin. See the Performance section for the Options/User Options dialog for a detailed explanation of what this control does to the MIDI notes.
It may help to think of this as setting "beat mode" or "continuous mode". In beat mode the InterOscitortm plays notes on a beat, whereas in continuous mode the notes smoothly glide in pitch.Pitch Center - This number sets the center note around which the InterOscitortm will vary the pitch. You can set it anywhere between 1 and 128 (which is the MIDI note number which will be used as the center pitch. 96 is usually middle C.)
Pitch Range - Top Note/Bottom Note - These two controls set the highest and lowest pitch that can be reached when you move your hand in front of the camera. Normally they are set to a wide range so that your hand movement will cause the pitch to change over several octaves. By setting the range smaller you can get more precise control over the notes you play (since more hand movement will change the pitch less.) You can also select the range of pitch being played; for example you could set it so that only low notes will be played. The numbers correspond to MIDI note numbers. You can also reverse the Tope Note and Bottom Note values which has the effect of reversing which direction you have to move your hand to increase/decrease pitch. Normally pitch increases when you move your hand up; by reversing these settings pitch will increase when you move your hand down.
Volume - Loudest/Softest - These two controls set the loudest and softest volume that be reached when you move your hand in front of the camera. Normally they are set to a wide range so you change the volume from complete silence to very loud. By setting the range smaller you can get more precise control over the volume (since more hand movement will change the volume less.) You can also select the range of volumes available; for example you could set it so that only soft sounds can be played. If the Softest setting is increased then it will not be possible to get complete silence no matter how far you move your hand. You can also reverse the Loudest and Softest values which has the effect of reversing which direction you have to move your hand to increase/decrease volume. Normally volume increases when you move your hand up; by reversing these settings volume will increase when you move your hand down.
See the Performance and the Ideas sections for more suggestions on how to get the most out of your InterOscitortm.
*** Video Drivers ***
Below this item will be a list of all the video drivers that have been installed on your computer. Click on one of them to select that video capture device to be used for input into your InterOscitorTM.*** MIDI Drivers ***
Below this item will be a list of all the MIDI drivers that have been installed on your computer. Click on one of them to select that MIDI output device to be used for output from your InterOscitorTM. This list will include both internal MIDI synthesizers and external MIDI interfaces.
General MIDI Menu

This item contains a list of all the General
MIDI instruments available in your internal or external synthesizer.
The check mark indicates the currently selected instrument. You can
scroll the menu up and down by left-clicking on the arrows at the top and
bottom of the list. Notice that some of the entries have a lower
case "c" in from of them. This is because there are two kinds of
sounds available in a synthesizer. One kind will only make a sound
for a short while, no matter how long you press a key (if you were playing
the note from a MIDI keyboard). The other kind will continue to make
sound for as long as you hold a key down. The instruments that sound
continuously are designated with a "c" and are treated differently by your
InterOscitorTM.
When the InterOscitorTM first
starts (or you select a "c" instrument) a single Note On message will be
sent to the synthesizer to start the sound going. From then on, Pitch
Bend messages are sent to alter the pitch of the note. In this way
you get smooth control over the pitch of the instrument. When playing
a non-continuous instrument (no "c" next to it) the InterOscitorTM
will send a new Note On message for every new frame of video. The
new Note On message also contains pitch information and in this way the
pitch can be changed in a quasi-continuous fashion. However, there
currently isn't much control over how often the notes repeat since it is
tied to the video update rate. With higher resolution images the
repeat rate will be slower and with low resolution images the repeat rate
will be faster. This is actually a quite interesting way to play
with your InterOscitorTM
turning it into an instrument similar to the old style analog sequencers
from the days of analog synthesizers.
You can change this behavior by calling up the Options/User Options
interface. If you select the checkbox next to "Use Note On/Off instead
of Continuous Controller" then your InterOscitorTM
will send Note On/Off messages for each video frame. If you uncheck
the box a single note will be sounded and then sent Pitch Bend messages.
NOTE: unchecking this box when an instrument without a "c" next to
it is selected will result in your InterOscitorTM
not producing any sound at all! This is because the note is sounded
once and then it fades away so that even though pitch bend messages are
sent to it, there is nothing there to hear anymore. You might want
to use this when you are using your InterOscitorTM
as a MIDI controller to control lighting or special effects devices.
In this way you can control the device with a wave of your hand without
producing any MIDI sounds.
Help Menu
Help Index...
This calls up the online documentation main index, which is probably how you came to be viewing this page.Register...
This leads you throught the registration process to enable the full functionality of your InterOscitorTM. The first part of the process looks like this:

Visit http://www.interoscitor.com/register.html now to find out more about registration.About...
This displays version information, trademarks, and copyright information about the InterOscitorTM.

That's all!
This entire document is Copyright © 2000, 2001, 2002
Peterson Enterprises